Hatching Eggs &Raising Fry

Now the guys have done their thing, its time to hatch the eggs and raise our babies. This is where the hard work starts!
Hatching Eggs
Take the spawning media and flush them with clean aquarium water, then transfer them to the fry tank
At this point, some people would add a little Methylene blue to the tank to prevent fungus. Should you choose to go the MB route, dose the tank and remove with daily water changes.
The key factor in determining the incubation period (time it takes for the eggs to hatch) is the temperature of the tank. At 22c, the eggs will hatch in roughly 5 days. If the water is cooler, it can take a few more days for them to hatch. Keep the water 18-24c.
A fertile egg will appear transparent. If the egg is infertile, it will take on a white appearance. These eggs should be removed as there is a higher chance of them getting fungus than a fertile egg.
Monitor the eggs closely and perform partial daily water changes. If you notice any fungus (white fluffy growth) on the eggs, remove them immediately. This can be done by siphoning them away using airline tubing, or sucking them out with a straw. If the egg is isolated, it may be possible to use your fingers, but be sure not to damage any nearby eggs. They are very delicate, so great care should be used. Fungus will spread from egg to egg, so they should be removed as soon as they're noticed. These eggs are not viable.
Ensure maximum aeration throughout. This will reduce the risk of fungus and minimise surface scum.
After a few days, you will notice a black dot in the egg. These are the eyes of the fry developing inside the egg!
Raising Fry
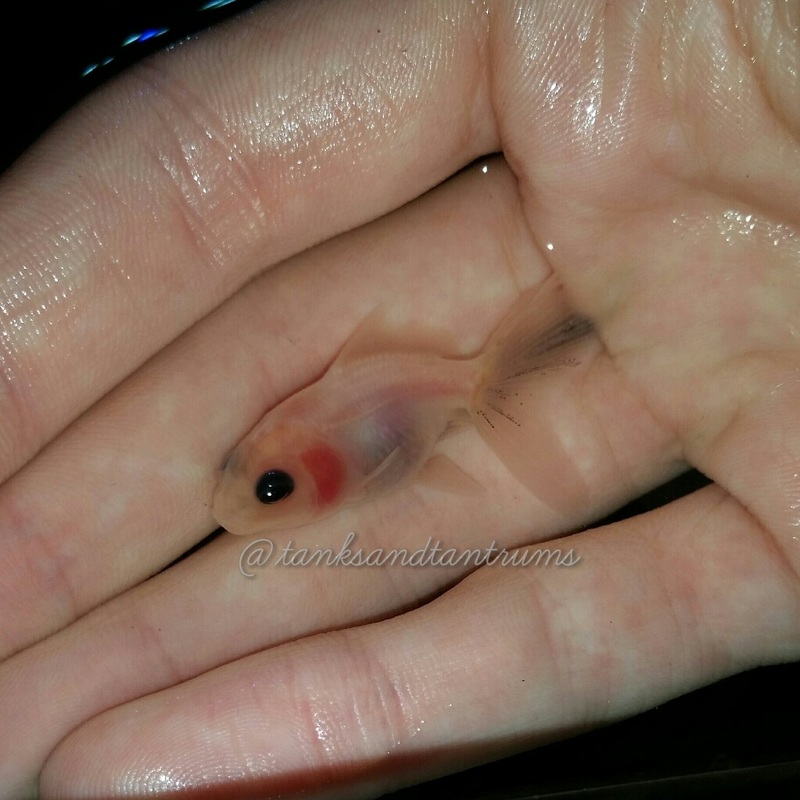
Once the eggs hatch, the fry will attach themselves to the nearest object. At this stage, they are referred to as wrigglers and will be about 5mm long. You will find them hanging, tail down for the first few days. They way move about a little, in sharp jerky motions, but most of the time, they will be suckered onto something.
Once the fry have hatched, you can begin to remove the spawning media. Check thoroughly for fry as you remove it. They can attach themselves well and deep in the media so be vigilant.
Ensure there is lots of agitation on the water surface. Biofilm/scum can be tricky for new fry to break through and they need access to the surface to take in air to inflate their swim bladders. If you have excess surface scum, perform a partial water change.. Increased aeration may be required, so adding an airstone or second sponge filter may be necessary.
They will still have their yolk sac attached for around 3-4 days. During this time, do not feed the fry as they will be feeding off the yolk sac.Once the fry have absorbed their yolk sac, it is time to start feeding them. You will notice them come away from the plants and starting to search for food. At this stage, fry become free swimming.
Once fry are free swimming, it’s much easier to clean the tank. Siphon away any debris and remove any dead fry immediately. Keeping the tank clean is the most important thing you will do, so ensure you monitor everything closely and perform plenty of water changes. Ideally 25-50% per day and dose with Prime. Our aim is to maintain pristine water for our fry to grow in.

Fry Menu
Alongside water quality, the diet of the fry will also have dramatic effects on their overall health and wellbeing. A high quality and stage appropriate diet is vital. It is important that hard food, such as pellets are avoided as the jaws of the fry are very delicate. Flake food should also be avoided as it is less nutritious and fouls the water quickly. Instead, we want to provide a soft, protein rich, high quality diet for our new babies.
Infusoria
Infusoria is microscopic critters, an ideal first food for fry during their first few weeks. They live suspended in water which enables the fry to easily graze away. It is cheap and easy to make and ensures a bountiful supply of food for young fry.
Take a jar/tub and fill with tank water with a lettuce leaf and some algae or an algae wafer and sit it in a window which receives direct sunlight. The water will take on a cloudy appearance during the first few days. This is a bacterial bloom which is great, as this is what will feed our infusoria. Once the water begins to clear, your infusoria are developing and eating away at the bacteria. Once fully cleared (usually takes around a week, so get making it as soon as the eggs are laid!), your infusoria is ready to be used.
Infusoria will turn the water green, so feed with a pipette or syringe in small quantities, to ensure the quality of the fry tank remains pristine.
I love to have three or four jars running at the same time to enable me to have plentiful supply of infusoria. Once your first jar is ready, add a small amount of the culture to the next jar with the lettuce and algae wafer and let it bloom as you use the first bottle.
Surface Algae
Surface Algae is also a perfect first food. It allows the fry to graze easily and doesn't foul the water. In fact, it helps us keep the water clean by eating excess nutrients in the water column.
Take a few pebbles and sit them in a tub of water in direct sunlight. Sit back and watch the algae grow. Perform water changes on the tub as needs be. Once there is psurface algae on the pebbles, move one or two to the fry tank. After a couple of days, rotate the pebbles, so you have a plentiful supply of algae for the fry to feed on.
Baby Brine Shrimp (BBS)
Newly hatched Baby Brine Shrimp/Artemia are a popular first food for Goldfish, as they are a disease free live food which the fry can eat as soon as they're free swimming.
You can easily create your own brine shrimp hatchery, and feed the brine shrimp soon after they hatch. You can also buy BBS/Artemia frozen or in jars at the LFS.
Microworms
Microworms are suitable from about week two onwards. They are very small nematodes that look like tiny, white worms which max out at around 3mm.
You can purchase started cultures and raise your own, very easily using oatmeal and yeast for them to feed off.
Bloodworms
Avoid live bloodworms as they can contain parasites and other nasties which we don't want to introduce to our aquarium. Instead, frozen bloodworms which have been thawed and chopped make a great, protein rich food for fry.
Chop as small as you can and feed small amounts from week two onwards.
Mosquito Larvae
If you are "lucky enough" to live somewhere mosquitoes are everywhere, the likelihood is that you will be able to collect/raise your own larvae to feed fry (you will also probably hate me.for saying you are lucky for living with mosquitoes!).
You can also buy frozen mosquito larvae, which is preferred as there's less risk of passing on nasties. They will probably need chopping to enable the fry to easily eat them.
Daphnia
Daphnia are a freshwater crustacean, which can be tricky for fry, so chopping them up is necessary when the fry are young. Feed from week two onwards.
Live daphnia can introduce nasties to the water, so should be avoided. Unless you have raised your own.
Egg yolk
Hard boiled egg yolk is a protein rich food which can be fed to fry. This should be used if other options aren't available, as it fouls the water very quickly. Should you feed egg yolk, perform a water change afterwards.
Place the hard boiled yolk into some low denier nylon tights and tie a knot in it. The fry will be able to graze through the nylon, without messing up the water too much.
During the first few weeks, fry should be fed as much as they need, 5-6 times a day. If you are feeding correctly, the fry should all be getting a fair share and shouldn't vary in size too much.
After a month or so, a high quality sinking pellet can be introduced. Be sure to soak the pellets in vitachem/Vitazin for 10 minutes prior to feeding to ensure maximum nutrition and soften them. Feed this alongside the live/frozen foods, these are vital for fry development as they are high in protein and contain no fillers.
Gel foods are ideal for fry and juvenile Goldfish, as they are soft and nutritious. You can make your own by blending bloodworms, spirulina, and vegetables with agar agar, or look into branded formulas. Repashy and NLS are both popular choices.
Fluke Treatment
It is advised that you treat fry for flukes at around 1 week old. Perform 2-3 rounds of PraziPro or Kusuri wormer plus, but don't salt.
Culling
Culling is necessary when breeding Goldfish. If you have an issue with culling, think carefully about whether breeding is for you.
Culling ensures all viable fry can grow to their full potential, it removes deformed fish which are more susceptible to illness, it means we have less fish so our water quality is better, it provides a good source of live food for adult goldfish, it maintains strong, pure lines... I could go on. It is vital that you fully understand the role of culling and are prepared to cull undesirable fry.
As hard as it may be, you can't keep them all. Potentially, you'll have thousands of Goldfish and it will be impossible to keep up with water changes as they grow. If they all reach maturity, you're going to need an Olympic sized swimming pool to house them in.
If you have thousands of fry, the risk of disease is greatly increased and they will compete for food. So the weaker fry will remain weaker whilst the stronger fry continue to get bigger and stronger.
The idea is to reduce the numbers of fry to a manageable amount and be able to grow the best specimens on. This means, from thousands of eggs, we will be raising around 5-10Goldfish. Fancy Varieties will require more culling as they don't breed true as single tailed. Should you be breeding Fancy Goldfish, prepare for big culls.
The first cull should take place when the fry are around 2 weeks old. Select the fish with the biggest defects. Fry with deformed bodies/fins or missing body parts should be culled immediately, allowing fish with proper formation extra space to grow.
At the 4 week mark, fry should have all body parts and fins, developing well, a nice smooth back and Fancies should start to develop their deeper bodies.
At around two months, start culling fry with undesirable caudal fins. In fancy Goldfish, you want fry which have two caudal lobes, fully split with a good fan. If you are breeding a variety with no dorsal, you should also cull fry who have a dorsal fin.
As the fry grow, they will need moving to a larger tank. Keep the water shallow, but increase the volume. So get a bigger tub and fill to the 6" mark again.
At the 12 week mark, runts will be obvious. Whilst a small fish isn't a bad thing, too small isn't a good sign. Goldfish fry which are significantly smaller will likely not read maturity. Those with telescopic or similar, protruding eyes should start developing them at this stage.
As the fry get bigger, those with a single anal fin are considered undesirable, and are potential culls.
Culling should continue until only the finest, healthiest specimens remain. This will enable you to focus on ensuring the fish you have receive the best care possible.

How to cull fry
You will need to separate the Fry to be culled from the fry you are keeping. To do this, when fry are small, scoop around 20-30 fry into a white bowl and take a soup spoon and select the fry one by one in the spoon. Take a close look at them. Those to be culled go into one tub, those you are keeping go into another. Continue until you have gone through all your fry. Use tubs, cups and spoons. Netting fry is too risky.
When you do your first round of culls, you may have a lot of fry. It can be easier to select the most deformed from the tank before going through individual fry.
Keep a small glass tank or jar on hand, so you can view the fish from the side, to examine the body, spine, etc clearly.
I keep a third container for fry which I am keeping, which are significantly larger, particularly during the first rounds. This is to ensure they don't eat all the food... or their siblings.
This process should be repeated weekly.
There are two methods which I recommend for culling; The first, is to feed fry to adult Goldfish. Only do this if the fry will easily fit into the mouth of the Goldfish. This can be risky. Although Goldfish are pigs, they may decide to keep a cull. In which case, option two should be considered. The second is clove oil.
Take your culls and place them into a shallow tub of tank water. This tub should never go near fry you wish to keep and should be kept away from other aquariums. Clove oil in small doses is not fatal but can make fish drowsy due to its sedative effect.
Shake a few drops of clove oil in a jar of tank water until it is emulsified and pour over the surface of the cull tub. The fry will fall asleep. Once they are sedated, repeat this process with more clove oil. After a few minutes the fry will pass. If you wish to be sure your fry have passed, you can place them into the freezer at this point.
